I implemented it on CentOS 5.5 i386 architecture. I think it can be run with almost all of unix distro. And you don't have to change your unix distro to the same as mine for successfully configuring.
Well, the command was same as you learned before at different articles, i'm not about to lead you up but, i just remembering all of you. Follow the step below.
Make sure that you are as root. Now, create a directory that you will use to put your backup data, you can use this command below,
mkdir /home/backupBut before we continue, i will show you how do i backing up mysql data, here is the command,
mysqldump -uroot -pMyP4s5W0rD my_database_name > /home/backup/backup.my_databases.sqlnote : command "-p" was the command to put your password after it.
You have to change some the command, because we are doing on different machine, different password, different database and different destination folder. adjust it with yours. If your basic command same as with me, then it will be not hard to scripting our autobackup shell script.
Well, let's create our shell file to /bin directory, follow this command below,
touch /bin/yourBackupShellFileName.shthen, type this command below to edit our file and fill it with our shell script,
nano /bin/yourBackupShellFileName.sh
fill that file with this script,
#!/bin/sh
# yourBackupShellFileName.sh
Mdate="$(date +"%d-%m-%Y | %H:%M:%S")"
mysqldump -uroot -pMyP4s5W0rD my_database_name > /home/backup/backup.$Mdate.my_database_name.sql
wall messages you want to tell.
Then save it by pressing 'CTRL+X' then press 'y' then press 'enter' to confirm for saving file. Now, let's set the permission of that file we'v create like so,
chmod 770 /bin/yourBackupShellFileName.sh
or, if you want the permission for that file execute only, follow this command below,chmod +x /bin/yourBackupShellFileName.shWell, you may test your shell script before set it up being autorun, by using this command below,
sh /bin/yourBackupShellFileName.shor
yourBackupShellFileName.sh
note : or change your directory to /bin directory and type yourBackupShellFileName.shIt's looked like ok so far. Now, like i said before, we will use the crontab to make this shell script to be auto run in the time that we will setup. Click here for more information about crontab. Let's continue the configuration with crontab.
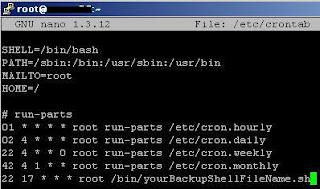
Now, open your crontab file by following this command below,
nano /etc/crontabit will be shown us like this picture,

now, add our custom setting at the last line, like so,
22 17 * * * root /bin/yourBackupShellFileName.sh
note : i set my shell script to be autorun at 17 through 22 minutes. Sequentially, it was minute (0 - 59), hour (0 - 23), day of month (1 - 31), month (1 - 12), and day of week (0 - 6) (0 is Sunday, or use names). And you may change with your own custom time.
look at the picture below, it should be like this,

Then save it by pressing 'CTRL+X' then press 'y' then press 'enter' to confirm for saving file.
Well, that's it. I hope this sort tutorial will help you to relieve your performance. See you on the next tutorial ^^
Auto backup in MySQL is very helpful to protect important data. MySQL scheduled backup help you to schedule backup. Thanks for sharing
ReplyDeletegood one. Thanks!
ReplyDelete
ReplyDeleteI tested it and it works well. thank you
Great article. Very helpful. Thanks!
ReplyDelete